
I spent several years sweatin’ in the hot Louisiana heat
-learning what’s needed for building these–learn from my experience!
If you live well north of the equator and aren’t really used to enduring southern-style heat, then there’s no need to worry because you can sit right where you are.
Now fire up your favorite portable coffee maker and reap the benefits of my years of figuring, cutting, gluing, nailing, hauling, and setting cabinets for bathrooms, kitchens, and more–all you have to do is read and I’ll tell you what you need to build some of your very own.
What You Need to Build Kitchen, Bathroom, or Custom Cabinets:

- Measurements
- Type of Cabinet
- Plans
- Materials
- Tools
- Fasteners
Before I get started however, there are a few other important things for you to consider:
- Will this cabinet be painted or varnished?
- Will you build or custom-order the doors and drawer fronts?
- Will this cabinet even have doors or drawer fronts?
- CAN this cabinet even have drawers or shelves?
- What will the top of this cabinet be: plywood, laminate, marble?
1. Get Your Measurements
The very first thing you’ll need to do is actually look at the space where you’re hoping to plop your next custom-made wood box and determine first if you can even put a cabinet there. Sometimes, you may even need to nab yourself a jack hammer and clear out some junk in order to get the area prepped for your new cabinetry vision.
So after you’ve decided that you can indeed build-up some wooden boxes in your desired spot, you’ll need to gather a few different measurements–not just one.
Keep in mind that if your space is angled, awkward, out of skew, or in any way severely “unsquare,” then that is a bit outside the scope of this article. It is likely that whoever built your house or space didn’t use the proper aligning tools for the job and that will require you to do some special figuring.
I’m writing this with the assumption that you’ll be replacing a simple cabinet, creating a stand-alone cabinet, or building a new cabinet for an empty space. Regardless of the reason, if you need to build an upper or lower cabinet, many of the same principles I list here will apply to what you’ve got in mind.
- The first point to keep in mind when measuring is the old adage, “Measure twice, cut once.”
It makes sense to double-check your measurements, especially if you’re working with expensive or rare materials, or a rare personality!
- The second point is to remember to measure both the front AND rear area for available width.

If you are going to put a new cabinet between the wall and another cabinet, between two walls, or between two cabinets, then it’s crucial that you get the measurements right. If you don’t, then the cabinet you pump out might just be too narrow to look like it goes, or too wide to go at all.
When we would measure houses/spaces for cabinets, we would always measure at both the top and bottom, as well as front and back. The reasoning is simple: NOT ALL SPACES OR HOUSES ARE PLUMB (even/straight/level/aligned/whatever).
There have been times when I built the cabinet perfectly to fit from the left to right, and it did–in the front. However, the rear of the space was uneven and narrower than the front, causing the cabinet to be incapable of going all the way back to butt flush against the wall.
This simply means that the rear of the cabinet needed to be narrower–something that I could’ve accounted for if I had been given the correct measurements!
Pay attention to pipes, electric plugs, wires, drains, doors, frames, etc. There are so many things that can cause your final product to not fit properly, so if you are a novice then you may not catch it until you’re doing the rebuild!
If you’re working in an unfinished space, then remember that there could be other accessories, devices, or installations which will be added sooner or later.
2. Choose Which Type of Cabinet
There are a few main types of cabinet but you can utilize similar principles to build anything you want, of course.
Here are the ones that cabinet shops are most familiar with:
CHECK LATEST PRICE ON AMAZON.COM
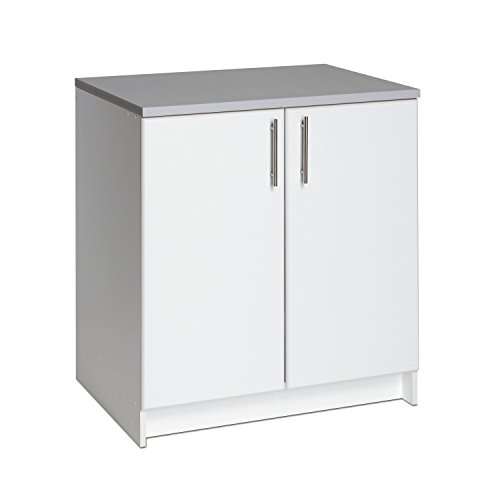
- These are the larger, deeper cabinets that sit on the floor
They typically have both doors and drawers, but can have just one or the other or even none, if it is just a facade (for appearance or to cover something else, such as a machine, pipes, etc).
You’ll find base cabinets in every kitchen and in most bathrooms, as well as in some living rooms, dens, family areas, and more. Typically they are fixed in place by different means, including being screwed to the wall with a cordless drill and long screws and perhaps even glued to the floor, depending on the situation.
Depth and height sizes can vary to anything you like, HOWEVER keep in mind that bathroom and kitchen sizes, while normally adhering to a common height and depth, are quite different and could vary a bit for your particular space, so just be aware!
Upper Cabinets
- These are the tall, shallow cabinets that screw to or hang on the wall.
They aren’t as deep as bases but they do vary in depth, depending on what you want and your intended application.
They also can vary in height as well, so if you have 8-foot ceilings, for example, you’re going to be a bit limited with how much space you have for the height.
However, if you want more inside space and aren’t concerned so much about having a “top” for whatever reason, then you can build them all the way up to the ceiling and then run some crown molding or similar trim around them to make them look nice and uniform.
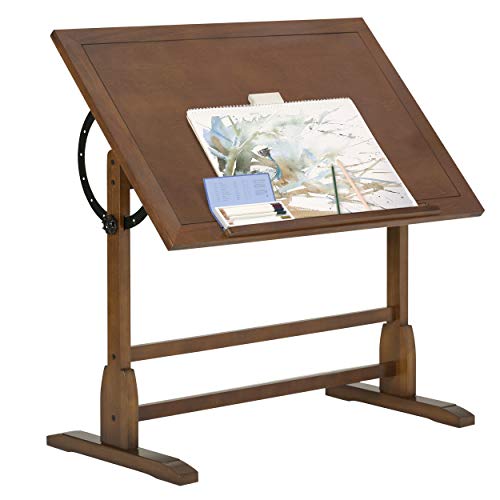
Desks
You might be thinking that a desk is a type of base cabinet but it’s not exactly the same so I listed it differently.
First of all, a desk doesn’t typically have the same required heights or dimensions as the kitchen or bathroom base cabinets do.
Another thing to consider is that sometimes they need to be movable or even sitting somewhere with the back exposed, so you have to think about whether or not the back needs to be “finished,” which means, basically, “look nice to the eye.”
A standard base cabinet (or desk) that is fixed to the wall isn’t meant to be moved at all, therefore we’ll typically use a 1/4″ piece of plywood to square it/frame it up before we screw it to the wall.
However, if you plan on making a desk which is movable and may have an exposed back or sides, then you’ll need to finish those with something a bit nicer and smoother, such as 3/4″ plywood (and not the rough stuff–unless that’s the look you’re going for!).

Entertainment Centers
Once again, these types of cabinets do sit on the floors but aren’t traditional “base” cabinets.
Also again, they vary in height, width, and overall design, as per the needs of the builder or customer.
It could be that you need what my parents asked for many years ago, which is a large, six-foot tall by six-foot wide, stained entertainment center with large drawers, double doors, ajdustable shelves on the left and right, and a large, wide space in the middle which was specifically designed for their new TV.
When I built this, I even made it impossible for the TV to be removed from the front side. This is simply a security precaution as they lived in a neighborhood which had suffered a few break-ins and were concerned about it.
The entire cabinet was large and heavy, and in order to get the TV out, a thief would have to pull the entire thing out and then try to remove the TV from behind, but even then he’d encounter some square-head screws which held the TV in place, further preventing it from being removed (am I a thinker, or what? haha!).
Still, entertainment centers will generally have some shelves and large doors, as well as some uppers that actually sit on top of the base countertops, and often have adjustable shelves, which is a special design that not all kitchen cabinets have–and few bathroom cabinets have.
*Note: “Base” cabinets like the Entertainment Centers and Desks–and sometimes even vanities–don’t often, if ever, get toe boards (kickers).
The reason is simple: we don’t stand in front of them and do stuff! In the kitchen or bathroom, we will stand in front of them daily, brushing our teeth, combing our hair, shaving, cooking eggs, washing dishes, chopping onions, and so on.
Because of this, the toe board design was created so as to make our interactions in the kitchen and bathroom less, well, annoying. Since we don’t utilize the other cabinets in the same way, we simply design them to go all the way down to the floor.
3. Draw Up Your Plans
I noticed that there are a good amount of people searching around for “cabinet plans” but I find this to be a bit odd.
CHECK LATEST PRICE ON AMAZON.COM
The main reason is that unless you’re going to buy pre-made cabinets at Home Depot or Lowe’s, your fixed, built-in cabinets will most likely be custom and require you to actually measure the space in order to both avoid mistakes and take full advantage of the space you have.
The height, width, and depth of your cabinets will vary depending on your actual needs and doesn’t have a lot to do with any “plans” you may or may not find on the internet.
Unless…
There are times when we get a wild hair and want to do something that’s way off the beaten path.
Of course, even with something as seemingly mundane as cabinets, to veer away from the norm can definitely introduce some challenges not easily handled by the novice or armchair carpenter.
Heck, even experienced cabinet guys like myself have to spend a good amount of time thinking sometimes about how to get something done, simply because it’s just not typical or a bit complicated.
So, I understand if that’s why you’re looking up cabinet “plans.” Still, I think that it’s not the actual plans that you need.
I think that once you know the style you like, then you can simply measure your space and then look at the common dimensions before you begin your figuring and purchasing. I personally would never look for kitchen or bathroom cabinet plans nor would I ever. I do sometimes like to look up different designs, materials, stains, finishes, or countertops, but I don’t look up plans.
Once I got a firm understanding of cabinetry basics, I could pretty much build whatever I see. For the most part you should be able to do the same.
Essentially, “plans” to me basically means the figuring that I mentioned above. What is figuring, you ask? Great question!
How to Figure Your Cabinet(s)
After you’ve measured your space and know your future cabinets’ exact dimensions, you need to actually draw them on paper.
By doing this, you’ll be able to have a clear, practical, and physical guide which will help you not only easily decide how much material you’ll need, but it will also be a huge must while you’re cutting out AND it will assist you in spotting any potential flaws in your plans which may not have been so while you were eyeballing it.
Essentially, this “figuring” will become your “plan,” and is a necessary component of having a successful, if not enjoyable cabinetmaking experience for you.
With that in mind, I’ll show you what you need and how to build some basic base cabinets, upper cabinets, and if I haven’t passed out, I’ll even show you some minor differences on putting together desks, vanities, and entertainment centers.
4. What Materials You Need to Build Cabinets
This will definitely make up the bulk of what you need to plan for, but what exactly you need will depend on your intended finished product.
Here are the main considerations:
- Will you be building one, stand-alone cabinet or a set?
- Will this/these cabinet(s) be set/fixed or free-standing and movable?
- Will this/these cabinet(s) be painted or stained?
- Will this/these cabinet(s) be for the bathroom, kitchen, or other room?
Once you know the answers to these basic questions, then you can select your desired materials. Let’s take a look at some basic options I’ve used for years and I’ll give you my personal opinion.
Should You Use Plywood, Particle Board, or MDF?
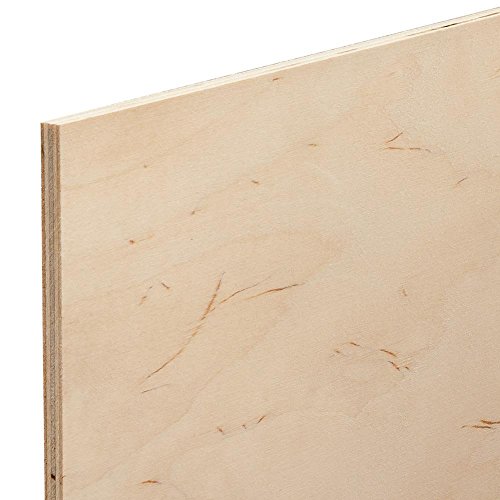
First of all, I will say that no matter what you decide for your end result–painted cabinets or stained cabinets–I would recommend that you get some nice-grade 3/4″ plywood for the sides and shelves. Despite the higher price tag, they are overall more resilient and lighter than the other options, plus they look better!
Is Particle Board a good material for cabinets?
Some shops use 3/4″ particle board for shelves, dividers, sides, and backer boards which is much cheaper, but it carries with it some disadvantages as well:
- It’s much heavier and will make carrying, hauling, or delivering the cabinet harder.
- It’s much less resistant to moisture or water and will swell considerably if it becomes wet.
- Particle board also receives nails and screws differently than plywood does: if you use your cordless driver or nail too close to the edge, then it can break off quite easily.
Now some people say that if it is properly sealed when it’s primed and painted, then the moisture isn’t an issue, and I get that. Some will also say that plywood itself isn’t impervious to sustaining water damage and bowing up some, and I get that as well.
However, based on my experience, it takes a heckuva lot more to damage the plywood–especially the good stuff–than it does the particle board, AND PB just looks like total crap and becomes 100% useless after its been affected by water.
Furthermore, it just doesn’t look as nice as plywood when stained, isn’t as smooth as a nice plywood finish, and is sooooo much heavier!
For those of you who already have experience with both all-particle board cabinets AND all-plywood cabinets, you should know what I’m talking about!

CHECK LATEST PRICE ON AMAZON.COM
Is MDF (medium-density-fiberboard) a good material for building cabinets?
My short answer is that it’s just not a good option.
I hold this opinion primarily for similar reasons to the particle board, but also another one: they don’t take wall to nails that go into its ends or sides.
If you nail or staple it on the surface, it’s not a big deal and will hold of course. However, this material is prone to splitting when a nail or staple enters the ends or sides, so when you couple that with the fact that it’s heavy and not water-resistant, it’s a no-brainer for me to just say no.
Ultimately, you can do as you like, so keep in mind that these are just my preferences. If you’re going to paint your cabinets and want to save as much money as possible, then you can definitely use MDF or particle board for your shelving and backboard.
However, for any “finished” or open ends (a side of the cabinet which will be exposed, not against a wall and visible), then you really need to at least use MDF, if not plywood for a smooth finish. Particle board just doesn’t make a good, smooth finish and will look pretty crappy no matter how much time you spent trying to sand it and dress it up.
Is plywood really my best material option for cabinets?
If you’re going to be staining your cabinets, then you need to think about what type of wood you want to use.
A simple search online will reveal the different types of woods and their appearances, but before you get your heart set on one in particular, you really ought to get your booty down to some of the local stores and find out what they have in stock, what they can get, and what the prices are.
Keep in mind also that whatever plywood you get for the cabinet needs to also match-up with the hardwood, so if you buy some maple plywood but pick up poplar hardwood thinking that it’s going to go well together, then you’re either a master stainer too hung-up on The Power of Positive Thinking.
This is an area where you truly need to take care if you want your cabinet to look like it’s not a Frankenstein’s monster.
Some hardwood may appear “white” to your eye and it seems like it will match up with the maple you want, but these woods can change color when you sand them and after you begin the conditioning and staining process, they will receive and take that coloring completely differently, so be warned!
I have stained a few cabinets but I am definitely NOT what you’d call a stain guy (unless you consider the food marks on my shirts as evidence).
I’d recommend that if you want to try mixing and matching hardwoods with different plywood, then you speak with an experienced painter/stain guy first.
Plywood for the Back
CHECK LATEST PRICE ON AMAZON.COM
Remember that for the back of your wall-mounted cabinets, you’re going to need some 1/4″ plywood which should be readily available at any local home improvement store.
I do recommend that you pick up something that is relatively straight and not bowed or warped, and there are two reasons for this.
The first is that when you proceed to cut it, you need to be as precise as possible and if the plywood isn’t very straight, then cutting it on your table saw or with your circular saw can just become either difficult, dangerous, or both.
The second reason is that by making sure that your quarter-inch material is nice and straight, you’ll have a better time framing-up or squaring your cabinets as you nail the backs on them.
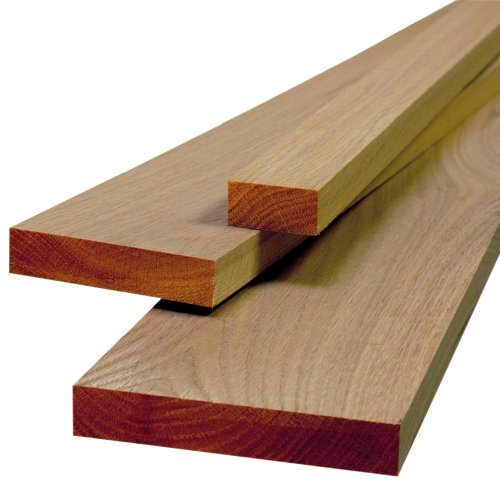
Hardwood
Here you can be a bit more frugal if you aren’t going to be staining your cabinets.
The simple reason is that when you build your cabinets, you just need them to be straight, square, and smooth, so that when they’re painted they’ll look just peachy and no one will know what lurks beneath that silky-smooth, glossy finish.
CHECK LATEST PRICE ON AMAZON.COM
The main paint-grade woods we used at my shop were gum and poplar, mainly because they were cost-efficient, easy to cut and work with, readily available, and came in long, wide sizes.
The main thing you’ll be using the hardwood for is what we call “face frames.”
Have you ever heard of a frameless cabinet? Well, that basically means that it is without the face frame, and the face-frame design is what I have built 99.99% of the time.
There were some special occasions where a frameless cabinet was necessary in order to maximize the room for special requirement, but overall we just didn’t do it for reasons I’ll briefly outline below.
So, if you are looking for tutorials on how to do frameless cabinets, then I suggest you go ahead and click away.
Perhaps you can try here: how to build frameless cabinets
What’s the benefit of building a face-framed cabinet instead of a frameless? Well that’s easy: it’s stronger, sturdier, and has the ability to last longer.
I’ve never seen a frameless set of cabinets with strength to match the hardwood-faced ones I’ve built. I have, however, also seen more than my fair-share of plywood face frames and, to be honest, this is just sad.
The problem with using plywood for the face frames is multiple.
- First of all, when you either nail or screw them together, it is way too easy for the ends to split, bust, or for the threads to “waller-out” the hole (destroy the inner threading, making it impossible for the screw to maintain a grip and secure the two pieces together).
- Second, when you piece together two separate sections of plywood, they won’t line up so easily and their seam or joint will be easy to see after painting or staining.Sanding it down won’t be a great option because it’s plywood, not hardwood, and the veneer will “burn” as you try to level it up.If you are going to stain your cabinet, then this will be a HUGE no-no! If it’s to be painted, it will still look terrible and you should do your best to avoid it at all costs.
- A third problem is that if you’re going to install hinges onto these plywood frames, then you’re going to encounter a similar problem described above with the screws.Cabinet doors can get quite heavy and those hinges need to be firmly–and permanently–mounted in place so that they can withstand thousands of openings and closings without the wood ever splitting or stripping.It is much harder for this to occur with hardwood and super-easy to happen with plywood, so it’s just another reason to say no to plywood face frames.
5. Which Tools do You Need to Build a Cabinet?

CHECK LATEST PRICE ON AMAZON.COM
Without knowing which tools you have, it’s difficult to tell you exactly what you will need in addition to your current arsenal.
Furthermore, you also need to consider how many you are going to build and perhaps even how often you plan to build. For all I know, you may be planning to run your own small business right from your garage.
If so, you can check out what I wrote recently on what I believe is the most important part of a business. 🙂
However, I can definitely recommend the main list that will help you have the easiest, most pleasant, and successful experience possible, and after you see the list and then read how to build a cabinet, you can probably figure out what can be substituted–and what can’t or shouldn’t be.
First of all, these are the tools which I used daily at the cabinet shop. If you have them or can possibly obtain them, then you’ll sweat less and get done faster:
- A table saw or circular saw (a jigsaw can be substituted for some cuts but it’s not very accurate or practical for these).
You will need these to “rip” long cuts of your large, wide pieces, such as plywood, hardwood, particle board, and MDF.
These can typically be anywhere from 1 1/4″ to 24″ or more, depending on what it’s for and how wide or deep you need the pieces.
- An electric miter saw (a handsaw and miter box is doable, but a lot of extra work and time).
This will mainly be used for cutting your long, then pieces to various lengths, such as the face frame pieces, toe boards, and shelving strips (hardwood pieces to cover the rough edge of the exposed shelves).
- A cordless impact drill or driver (and a cordless drill if available).
By having both, you can utilize them for jobs they are custom-made to do and it will make things easier for you.
If you don’t have either–or perhaps and outdated or tired tool–but have decided that now’s the time to buy one, then you could consider looking at one of my favorite drill kits.
You’ll definitely need at least one of these types of tools for screwing your face frame together, installing hardware, attaching hinges and doors, adjusting the doors, and perhaps even mounting/affixing your cabinets to the wall.
If you’ve planned and or desire to do any of these then it’s worth the purchase.
*It’s worth noting here that you will need to secure yourself a stud finder as well, if you plan to screw your cabinets to the wall–and I’m not talking about someone to help you find a macho man.
Well duh, right? You’d be surprised at how many people forget this little necessity.
You’ll have to use this simple yet irreplaceable tool to not only measure your cuts, but to also pre-measure your space and account for any possible special nuances such as electric outlets, plumbing, gas lines, wires, and more.
Also, you should consider the depth of your cabinets because people often don’t take into account trim around the doors or what’s to the left or right.
Measure, measure, measure!
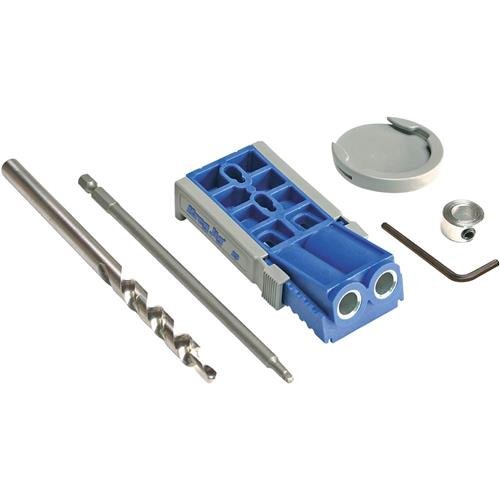
- A pocket hole jig
This will be used for creating angled holes in the face-frame pieces to be screwed together.
It’s by far and away the best way to bring-together your cabinet’s front pieces because it is not only the strongest but lines up the best.
You may not have used one of this doohickeys before but I can assure you that once you’ve used them a few times, you’ll not only get used to it but appreciate the added value it adds to your creations.
CHECK LATEST PRICE ON AMAZON.COM
- A drill bit (for pocket hole jig).
This is pretty simple, really — when you use the pocket-hole jig to put pilot holes in your face frame pieces, you’ll need a nice wood drill bit in your cordless drill.
This may or may not come with a pocket hole jig set, but you’ll see that when you buy it. If it doesn’t, then make sure you get the correct size to go with it (ask the seller or check with a sales clerk to be sure, or you can do what I do: look on the package!).
- A Pneumatic or cordless nail gun (preferably)
A hammer can feasibly be substituted if you don’t have either of these, but again, it will take longer and be a LOT more work than I would ever care to do.
Alternatively, you can actually screw your cabinet together using a cordless drill or impact drill, but you need to be careful about not going too deep and splitting the wood.
If you decide to go this route then you might also want to consider drilling pilot holes to make sure it goes into the right place and keeps from splitting.
Some other points to consider are:
When you start to put the face frame onto the cabinet frame, you generally want to glue it first–which is standard operating procedure for these cabinets. It makes them stronger and helps keep them together better.
If you decide to screw your fronts on, then you have to worry about lining it up well and keeping it lined up while you’re simultaneously moving around, putting in screws. It’s not easy!
Furthermore, if you’re going to stain your cabinets, then putting a lot of screws into the front of it is not really an option, now is it?
- A hammer (it’s obvious that you’ll need this for various things–it’s a hammer for crying out loud!).
If you decide to “bang” your cabinets together the old-timey way–with a hammer–then you’re going to require this.
However, even if you have or decide to buy a powered nailer, you’re still going to be in a ton of situations where a hammer is required.
If you don’t have a hammer, well….then I would ask you what exactly do you know about anything you’ve read so far?
Did you find this page by accident, or perhaps you’re lost or bored? (maybe board. haha.)
- A Pneumatic or cordless stapler (I don’t recommend a common metal, manual stapler for this).
This will be used for a variety of tasks where the material is too thin to be held down by a regular nail.
The staples are round and therefore can secure 1/2″ or 1/4″ material quite well.Again, if you decide to use a hammer instead, then that’s doable, but….it will be difficult to manage.
Having to hold items together while nailing staples is quite awkward and is made even more so if you’ve put glue on them first, similar to what I mentioned before above.
- A C-clamp or C-Vise Grip (preferable).
These have one main, simple focus: for holding down the face frame pieces on the table while you screw them together.
When I first started at my friend’s shop they were using standard screw-down C-clamps to secure the joints together while putting screws in through the pocket holes.
One basic kitchen base cabinet can have anywhere from 12 to 20 joints to put together.
Do you realize what this means?

It literally means that if you’re using a C-clamp to hold these joints together, then you’re going to have to screw each one down, twisting that handle nice and strong, until the face frame and joint is secure enough so that you can screw them together (you’ll utilize your hammer here in order to tap them right into place–see? The hammer is useful already!).
After you’ve finished screwing each joint together, then you’ll have to unscrew the C-clamp and then move on to the next joint, one at a time. If one face frame has 20 joints, that means screwing that clamp down 20 times and then unscrewing it 20 times!
This is unacceptable to me–especially for a shop which required hundreds to be made each month!
My solution was to pick up the C-clamp style Vice-Grip which I found in my local Lowe’s home improvement store. It’s invaluable even if just for this one application–and today, everyone at that shop is still using one.
I should be getting residuals!
If you are thinking about just using a simple spring-loaded clamp for cheaper and seemingly faster results, then forget about it. These types of clamps aren’t strong enough to keep the joints together while you’re driving the screws in.
Trust me, I’ve tried. Just. Say. NO!
- A pad sander and/or disc sander.
The interesting thing to note here is that I utilize all three of these types of sanding in order to produce a good finished cabinet.
A disc sander is great for speed and finishing, as it can cover large areas in shorter period of time and its sanding discs can not only be quickly changed, but also offer a variety of “grits” (amount of smoothness or roughness) per your needs.
I always used this particular sander for the sides and fronts of my cabinets.

Pad sanders aren’t recommended for outside, finished-area sanding such as the face or sides of the cabinets like the disc sander can be used. Now I won’t say that it’s not usable for that and engage the trolls, buuuuut — it’s just not ideal for a couple of reasons.
First of all, it’s just not fun to use. It’s loud, isn’t easy on the hands, takes much longer to accomplish the same task that a disc sander can wrap up in seconds, has a hard time with joints that aren’t matched up well, and doesn’t leave as good and smooth of a look as the disc sander.
It’s better for you to utilize the pad sander where it’s most excellent: for smoothing out the inside of the hardwood face frame after it’s been nailed to the front of the cabinet, sanding the shelving strips used to cover the rough edges, and knocking off the sharp edges of the cabinet to give it a nice feel to the touch.
As a final thought, sandpaper can be used by hand, BUT, as mentioned so many times before with other manual tools or procedures, it will take a LOT more work.
Still, I do often use sandpaper by hand to take off some sharp edges, especially on the outside of the cabinet where it will be most exposed to scrutinizing eyes.
- A few pencils!
Yes, for sure you’re going to need a small arsenal of pencils which you’ll go through faster than Napoleon went through soldiers at The Battle of Waterloo.
I would say “and a pencil sharpener” but you may just prefer to use a knife or utility blade.
Still, whatever you prefer is fine, but at our shop we did opt to have a typical school-style pencil sharpener on-hand because it gives a perfectly-formed point which is highly useful for making marks and lines.
If you are more like my dad, then perhaps you can just make 3 or 4 quick cuts with your over-sharpened buck knife and then get back to marking.
6. What fasteners and hardware are needed for cabinets?

Okay, this is the list of “everything else” that I can think of that would be necessity for me but perhaps at least beneficial to you, if not necessary.
- 1 1/2″ nails — the use should be obvious:
You’ll need these for doing the bulk of the banging together of your lovely boxes.
Nailing the sides to the bottom shelf, middle shelves, and top (if it’s an upper cabinet), nailing the face frame onto the shelves and sides, nailing the back board to the sides, nailing some runners (support pieces under the cabinet which sit on the floor) onto the bottom shelf, nailing the toe board on, and more.
- 3/4″ and 1″ staples
These serve a couple of different functions but operate in the same way.
They each are meant to hold pieces on the cabinets which would be either impossible or difficult for regular nails to hold.
The different lengths are needed because there are different thicknesses of material for various applications, of course.
You’ll use them to:
Put on the 1/4″ backing, put on the shelving strips, nail the drawer boxes and bottoms together, and possibly to nail drawer fronts onto the drawer boxes, depending on your preferred attachment method (you may want to just screw them on, as I did for my parents’ entertainment center. Still, we exclusively stapled them on at the shop).
- Wood glue
This is simply to help the cabinet stay together better, be stronger, and last longer.

There’s no sense in making the nails do 100% of the work and, in truth, this is foolish–especially if the cabinet is going to be free-standing and occasionally moved around. Over time it can become loose and glue is, well, the glue that binds it together.
It’s also important to make sure your finished ends are glued together because if it starts to come apart, then not only is it going to be easily seen, but you’ll have to mess up your finishing (paint/stain) job in order to nail it back together.
For a stained cabinet, this could be a huge mar on the appearance.Which type of glue you guy is really up to you, but we often used Elmer’s wood glue and found it to be practical and easy to use for most cases.
A friend of mine often demands things that are “the best” and uses Gorilla Glue, and while I have used it and vouch for it’s performance, I will say that Elmer’s is good enough for me and I hate to see what a cabinet looks like if you have to pull the face frame back off after setting it with Gorilla Glue.
Just food for thought.
- 1 1/2″ wood screws
These will be used for the pocket holes and securing the face frame joints together.
In my friend’s shop, we preferred to use square-head screws for a couple of reasons:
First, they were just easier to screw in because the head of the screw was something that simply wouldn’t strip out–it is deep and holds the bit very well.
Another reason is that the square-headed drill bit, as a result of the lack of stripping, lasts for a very long time.
The last reason is that the heads were flat on the underside as opposed to the common wood screw, which is angled, therefore when it flushes up to the wood, the pressure is unified and holds the joint together nicely.
- Wood filler
You will definitely need this to fill the multiple holes your going to leave on the front or exposed sides of your cabinets, prior to sanding, painting, or varnishing.

What you buy will depend on which type of cabinets you’re going to build–paint-grade or varnish–and possibly which type of wood.
If you’re going to be sticking with paint-grade cabinets, then I would again recommend a simple and easy-to-use wood filler from Elmer’s. It comes in various sizes from small, medium, to large sizes, is cost-effective, super-easy to apply, and dries relatively fast.
If you’re going to stain your cabinets, then please don’t use paint-grade wood filler!
Once again, what you need will depend on your material used, and if you are using stain-grade material, then you need to match it up with a similarly-colored wood filler.
We often used something called “PL Fix,” which seemed okay but is a bit rougher than the paint-grade wood filler and dries out much, much faster.
If you’re not quite sure which type you need, then you can either check online, ask a local painter, or even check with a knowledgeable clerk at your local DIY store. Each product, however, will give you an idea of which woods and shades it should match, so if you’re not overly critical, then you can just choose what looks best.
- Drawer Rollers
1 set for each drawer you need, which includes rails, rollers, and screws.
Now you may or may not be planning to include drawers in the cabinet you’re planning to build, but if you are then you’ll need to pick up one complete set of drawer roller hardware for each drawer.
You would do well to remember that the depth of your cabinet is very important as it relates to something like the drawer.
For example, if your cabinet is going to be 24″ deep overall, then you definitely can’t build drawers of that length. I won’t get into the specifics of that here, but after you figure out what the actual length of your drawers can be, then you’ll need to locate the same length rollers to match up with them.
If you are building a deeper-than-average cabinet and are thinking about larger, deeper drawers than even Fat Albert had, then you might want to consider looking at some full-extension draw rollers for added stability.
Remember to check the various lengths and verify what your drawers can or should be!
- Sandpaper to match your sanding methods and tools.
Here, for your finish (the exposed front and sides of the cabinet), you don’t want to go any lower than 120-grit “roughness” if you’re going to paint your cabinet, and I would recommend at least 180-grit if you’re going to varnish it.
If you really want a smoother, finer finish, then you can move up to 220-grit or even a bit higher.
Of course, these particular grits are for the disc sander, assuming that you’ll be using it to do your finish work.
If you use a pad sander, then you can do the same but as I mentioned above, it just isn’t ideal for several reasons.
If you’re feeling particularly frisky and are going to sand it all by hand, well, then good luck to you and godspeed.
- Doors
If your cabinet is going to require doors, then it can be quite the challenge.

You have three basic options:
- Pay a shop to manufacture some professional-looking doors
- Order some doors from a home improvement store or cabinet supply shop
- Make the doors yourself
Obviously the last choice will the most challenging and potentially even the most annoying, but it could definitely be the cheapest.
However, it’s highly unlikely that your custom-made-by-dad (or mom) doors will be the talk of the next dinner party at your home if you aren’t careful.
If you order them from a local shop, you may or may not find a good price but the good news is that if you plan to paint your cabinets, then they can make your doors out of paint-grade wood (lower cost than stain-grade) or the even-cheaper MDF.
One thing to keep in mind is what type of hardware you’re going to be using because this may pose a bit of a challenge for you when buying or building your doors.
We used European-style hinges almost exclusively for our bases and uppers, and we had a special machine from Blum in order to drill the necessary holes the hinges needed to sit in.
The key point to remember is different hinges require different attachment styles so be sure to factor this in before choosing your door sizes and how to make them!
- Drawer faces
This is much easier than the doors because all you really need to do is get the right size and, once you do, attaching is a breeze (but not of the NFL variety so don’t get too excited).
If you get your doors made by someone else, then it’s best to have them go ahead and make the drawer fronts (or false fronts that look like drawer fronts but are nailed-on and non-functioning) as well.
The drawer width should match up with the width of the door that is under it, and the style should be similar as well.
If you decided to make these on your own but have someone else make your doors, then even if you have a router your drawer fronts just might not match up enough to look “nice.”
Use your own judgment but remember that you or someone else is gonna have to look at these every day!
- Cabinet Pulls and/or Handles
This will be 100% up to you because your tastes or preferences will rule, as well as door type you’ve picked.

You can buy this in your local hardware store or peruse the vast selection online–there’s really no way to go wrong, but there are some points to consider:
First of all, what is the theme, design, color, or style of your kitchen? Will the white-with-rosebud drawer pulls really match the modern, stainless-steel design of your kitchen?
Not likely. Remember to think about how these handles or pulls are going to match up to what you have or are going to have.
Second, be sure that the screw lengths you have will actually make it through the drawer face AND the drawer box behind it.
The drawer boxes we built were made with 1/2″ plywood or MDF (I prefer plywood, it’s stronger and stays together much better), and the drawer faces were 3/4″ hardwood or MDF, normally.
You can do the math on how long the screws needed to be.
- Hinges and if needed, hinge plates
If you utilize the Euro-style hinges I mentioned above, then they’ll come in a set which includes the “plate” as well.
The plate is a metal piece you will need to screw onto the inside of the cabinet’s face frame before attaching the hinge to it.
The hinge itself is affixed to the inside of the door and can be clipped-on to or off of the metal plate, thus making the door easily removable and adjustable, as well as hidden–which are all great properties of this style hinge and another reason why we used them to begin with.
Once we put or set the cabinets in place, we could then proceed to attach and adjust the doors, and then staple-on the drawer fronts, lining them up with the doors. If they were moved or shifted around after, it was a simple matter of adjusting them with a cordless drill.
Final Word
Last but most importantly, I need to add a word about safety.

The first man I ever worked for in a cabinet shop was in his 70s and had entered that business at a young age. Within less than a year of getting married, he sliced his hand open on a table saw and had to have emergency surgery.
While he didn’t lose any fingers, he did lose a large degree of mobility and it severely hampered his productivity and ability to provide for his family in this line of work.
Still, he persisted in cabinetmaking and to this day is still involved with it and his son’s cabinet shop, although to a lesser degree, of course.
The point I’m making is that you need to be careful when you’re using power tools, especially the ones which have the power to cause severe, permanent damage.
I’ve ripped and cut out a lot of material and built–literally–thousands of cabinets in just a few short years. During that time I’ve sustained my fair share of cuts, gashes, bruises, punctures, tears, and more.
None of those were enjoyable, but some of them were dreadfully painful.
There’s no telling how much time we have on this earth, and if you have people you care about, then I applaud you for wanting to care for them, provide for them, or make them something special.
However, please remember that every part of you is not only special to them, but can also help you to more easily accomplish your desires in life–so always take care and remember safety is more important than speed!
Protect your eyes, hands, back, feet–your whole body!
And Last-Last: remember to enjoy what you’re doing.
Hope this helps!
-Brandon